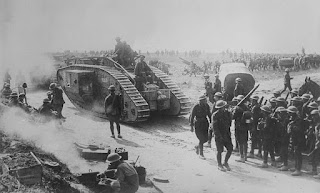
 |
| Part of the British advance on Bapaume August 1918 |
The war was into its fifth terrible year,
but events were now moving swiftly. The fourth anniversary of the Sarajevo
assassination on 28th June had seen Germany’s final assault still
advancing and the Allies apparently close to exhaustion along most of the
Western Front. By the anniversary of the outbreak of war, the Germans were
decidedly on the back foot, and the coordinated strategy of Foch was coming
into play. Those 37 days were as eventful in 1918 as they had been in 1914.
There was still much to worry about. After
a lull during the worst of the crisis, public discontent and industrial unrest
had returned in Britain and France. Germany’s material gains from the
overrunning of Eastern Europe post Brest- Litovsk (see Post 22/1/2018) were
proving elusive, even illusory, but the Allies were still worried by the twin
threats of Bolshevism and German advances through Europe into Asia. British and
French forces had established bridgeheads at Murmansk (in March) and Archangel
(on 2nd August) in Northern Russia. Encouraged by the achievements of
the Czech Legion (See Post 31/5/2018) the Allies wished to bolster the
remaining nationalist forces in Russia resisting incursions by Germany
(supporting Finland) in the northern Baltic; and also to link up with the
Czechs to strengthen ‘White Russian’ resistance to the Bolsheviks further south. It was an
impossible task, and from the Volga to the Caucasus, and into northern Persia
the positions were dangerously confused and unstable. Turkey was by now nearly
as weakened as Russia, but with German support (much reduced from earlier
years) threatened to take key areas of the Caucasus, including the oil fields of
Azerbaijan (shades of WW2). British forces moving north from Baghdad (see post
7/12/2017) were dragged hundreds of miles to the Caspian Sea to help save Baku
from capture (they succeeded).
With the Central Powers’ positions in the east so
uncertain, Ludendorff saw that he had little option but to hold on as best he
could to his Western Front positions.
After the success of Amiens (previous
Post), Haig agreed with Foch that a shift of emphasis further north was
preferable to maintaining the focus on Chaulnes. Byng’s 3rd Army
lined up to the north of Rawlinson’s 4th (see Map), and was closer to
the Siegfried Line – now a realistic objective. Haig instructed Byng to plan an
advance that would take the Arras-Albert railway link, and finally make Arras
safe from counter-attack. This would put him in a strong position to attack the
Siegfried line and push further north towards critical German positions in
northern France. It had similarities to the 1916 Somme plan, but this time it
was part of a much wider coordinated strategy commanded by Foch.
On 21st August, on a nine mile
front between Moyenville and Beaucourt (that included part of the 1916 front -
see Map), Byng launched his attack at 5am. It was another wet and misty dawn.
Although well dug in, the Germans were focused on shoring up their withdrawal
further south. They were surprised, and overwhelmed., and by the evening the
British had advanced to their railway objective. The following day, Rawlinson’s
army on their right flank came into the attack, creating a southern pincer for
a definitive attack on Bapaume. This took place on 23rd August, and
succeeded by 28th. In the meantime, several of the infamous villages
of the 1916 campaign were cleared, including Mametz, the Thiepval ridge, Martinpuich and Le Sars. As these hard fought
but convincing victories unfolded, Foch broadened the attack. On the southern
flank the French pushed forward again towards the Canal du Nord. On the
northern flank on 26th August Horne’s army pushed east from its
Arras line. These multiple attacks stretched the German attempts to withdraw in
an orderly fashion to their deep defensive positions on the Siegfried line.
On 30th August, amid advances
along most of the line from Arras to Noyon, the Australian 2nd
Division captured Mont Saint-Quentin. This hill, rising from the east bank of
the Somme guarded the town of Péronne. Having
crossed the marshy Somme during the night, they surprised and defeated – with
no artillery backing – an elite German garrison. Péronne was duly taken by the Australians the following day. This was
a great prize, and a remarkable exercise by the Australians, planned and
commanded by their leader General John Monash.
 |
| John Monash. Like the Canadian, Currie, a no nonsense leader of Empire troops |
Now Foch was turning the screw. Horne’s 1st
and Plumer’s 2nd armies in Flanders attacked, recapturing Bailleul
and Mount Kemmel (see Post 10/5/18). East of Paris, Mangin resumed his advance,
pushing further north and east. Most tellingly, Currie’s Canadian Corps (part
of Byng’s 3rd Army) attacked the pivot of the Siegfried line - the
Drocourt-Quéant switch – and captured
six miles of the line between Etaing and Noreuil.
Cumulatively, these actions pushed
Ludendorff to despair. He had no option but to marshal his defences behind a
line of water cover – the river Oise; the Canal du Nord and the marshy river
Sensée (to the west of Douai). The main Siegfried
line section covering Cambrai and Saint-Quentin was still intact, but both ends
were now vulnerable.
Final small scale attacks by the British
along their new front prepared the ground for the attack on these two decisive
centres. In less than a month, the British had moved their line from an
approximate north – south connection Arras-Bapaume-Péronne to be threatening Cambrai and Saint-Quentin. In the process the
German withdrawal may have cost less casualties than their Kaiserschlacht offensive, but they had lost 70,000 prisoners of war,
and over 700 artillery pieces.

No comments:
Post a Comment