Tuesday 27 October 2015

Galliipoli 11. Aftermath and 'what ifs...'

What was left behind on the Gallipoli Peninsula?
Although the Dardanelles campaign finished with the fillip of two heroic and brilliantly executed evacuations, these were no more than a postscript to a dismal year of repeated misjudgements and failures. The campaign itself might never have started but for early failures of the Mediterranean fleet.  Once the British Government had voted in favour of a campaign in January, indecision and confusion persisted, and the bad news followed at regular intervals: the failed naval attempt to force the Straits; the first landings at Cape Helles and ANZAC; the unsuccessful battles for Krithia, and the final fated attempts at Suvla Bay and ANZAC. The consequences were significant.

Throughout 1915, the Allies lack of success at Gallipoli was damaging to their prestige - particularly to Britain's - and this impacted adversely on the finely balanced stances taken by the various players in the Balkans. The short term aftermath saw Bulgaria confirmed for the Central Powers as a belligerent, and a major contributor to the destruction of Serbia.
Greece held more closely to her position of neutrality, notwithstanding the efforts of Anglophile Prime Minister Venizelos and the obvious destruction of Serbia taking place near to her borders.  The Greek King (related by marriage to the Kaiser) was determined to keep his country neutral, and once again Venizelos lost his office as PM. There was a mistrust of the Allies, both of their intentions and of their ability to deliver victory. Even the offers of Cyprus and Smyrna to the Greeks by Britain could not induce them to declare. Buchan's summary: "We underrated the importance of the Balkans from the start. History will record that our difficulties were great, but that they were surmountable, and that they were not surmounted"

Turkey, emboldened by its success in defending the Gallipoli peninsula, and supported and reinforced by Germany, had new confidence in Mesopotamia (see next post) and was able to divert more forces to this region and the Trans-Caucasus.

Back in London Churchill, having resigned from the Government, wasted no time in enlisting with his regiment, the 2nd Battalion of Grenadier Guards and crossing to France to familiarise himself with the trench warfare on the Western Front. Kitchener's reputation had been badly damaged by the indecision he had displayed throughout the campaign, and significant changes to the conduct of the war by the British Government would be made by the end of the year. Hamilton's and other senior Generals' conduct would come under close scrutiny in the Dardanelles Commission of 1916, and for many their careers would not recover.

There was now a strategic vacuum left by the Gallipoli failure. Only the Salonika reinforcement now stood as an Allied base in South Eastern Europe. The Western and Eastern Fronts became again the areas where decisive events would most likely occur, but with hardening positions on both sides, a long war of exhaustion was probable.

All of this had an impact on the neutrality of the USA. In the short term, the Germans took full advantage of Britain's embarrassment, with propaganda, pro-German agitation and more overt diplomatic efforts to persuade the Americans of the hopelessness of the Allied cause. This prompted John Masefield's book Gallipoli as counter propaganda to the the Germans, and he promoted it with a lecture tour of the USA.

What if? And yet, history would have been so different if....

Churchill in particular always held to his view that implementation was wrong, not strategy. Even if he bears much of the responsibility for poor implementation, there are fair 'what if' points, since it is now clear that the Turkish defences were close to collapse on several occasions, and that a better conducted campaign by the Allies could have forced the Straits. Inter alia, IF:

  • the initial naval bombardment had been better supported with land forces, surprise may have paid off
  • the Cape Helles landings had been better conducted Krithia would have been attainable
  • more reinforcements had been provided earlier in several cases, particularly the dispatch of the 29th Division in February, and for the Suvla Bay landing arriving belatedly in July  
  • Stopford had acted with greater urgency at the eventual Suvla landing in August
  • the Greek offer of its army and alliance had been accepted in 1914
  • Britain's subsequent diplomatic efforts in the Balkans had been more fruitful
  • Keyes and de Wemyss's last proposals for naval action rather than evacuation had been accepted
Ifs and maybes. Regardless, it must be remembered that forcing the Straits of the Dardanelles was a means not an end. The end was to be the siege and capture of Constantinople, knocking Turkey out of the war, and opening up the communications to and from the ailing Russians. There is little evidence that convincing plans were prepared for this equally challenging operation, rather a hopeful expectation that the Turks would simply fold up. Without this, even a successful passage of the navy into the Sea of Marmora would have had relatively little impact on the war.


Admiral Sir Archibald
'Arky-Barky' Milne.
"The Admiralty pays me to
be an Admiral, it does not
pay me to think" (allegedly)
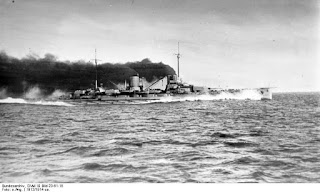
Finally, the whole campaign might never have happened but for the errors and incompetence of the British Mediterranean Fleet in the first few days of the war in August 1914.  Churchill does not mention this, perhaps because his control freak tendency at the Admiralty was an important contributor. By a combination of factors- misjudgements and nervousness from the the two senior Admirals, Milne and Troubridge; poor signalling; and confused and confusing instructions from the War Office (i.e. Churchill), the fleet allowed the German capital ships Goeben and Breslau to elude capture as war was declared. Milne was the unimaginative Commander in Chief, whose conventional mind, (according to Massie in "Castles of Steel") was "swamped by the numerous messages and orders" coming from the Admiralty. His famous and/or apocryphal comment (opposite) says something - either about him, or about the Admiralty's overuse of the recently implemented wireless telegraphy. He dispatched his second in command Rear Admiral Troubridge with two Dreadnoughts, Indomitable and Indefatigable, to search for the Goeben. When eventually Troubridge came into contact with his prey, he decided against engaging with her. The Goeben, with Breslau, was allowed to escape to the Dardanelles.
SMS Goeben, nemesis of Milne and
Troubridge

Turkey was slightly bounced into allowing them free passage, and to enter the Black Sea. The Germans promptly turned over these ships' flags (though not their crews) to Turkey, instantly compensating for Britain's refusal to provide Turkey with her two commissioned battleships, impounded on Tyneside. This single act pushed Turkey into relinquishing her neutrality and joining the war on the side of Germany. Troubridge later faced, but escaped, court-martial for what many viewed as an act of cowardice.

Thursday 15 October 2015

Gallipoli 10. The End

Beach Cemetery, ANZAC Cove
At this late stage, the British still felt that they would have to make another offensive against the peninsula, at a minimum to keep Greece and Romania onside. A Calais conference of Allies in July had determined there would be no further major Anglo-French initiative on the Western Front in 1915, but again Joffre was determined to challenge this, and he persuaded the French Government, and subsequently Kitchener, to support his new plan for the largest offensive yet across Artois and Champagne (the British contribution being at Loos, as we have seen). Churchill describes how he protested strongly at this volte face by Kitchener, but the decision was supported. The implications were all too apparent for those tenaciously holding ground on the various beachheads of Gallipoli. They would be left to hold what they had, with minimal supplies and reinforcements, while British resources would be prioritised for France. 

At the same time France, for internal political reasons, decided that a substantial new force of four Divisions under Sarrail - an enemy of Joffre - should be sent to the Eastern Mediterranean either to support Gallipoli from the Asiatic shore, or to land at Salonika. Naturally, Joffre was unhappy about this, but was pressured to agree to the transfer of forces from the West when the outcomes of his own offensive had become clear (‘when’ being a moot point).
It is one more example of policy confusion and inconsistency with respect to Gallipoli, but it seems to have happened independently of the decision on 15th October to relieve Sir Ian Hamilton of his post as Commander of the Mediterranean Expeditionary Force. As the Government considered the merits of switching forces to Salonika, Hamilton was asked his views on the feasibility of evacuating Gallipoli. His abrupt response - that it would be “politically and strategically wrong, and practically impossible” – earned his recall to London. His replacement, General Sir Charles Monro, was a senior figure, active in France, where he was popular and had led 2nd Division and 1 Corps with distinction. He was firmly in the ‘decisiveness on the Western Front’ camp. He arrived at the Dardanelles on 28th October, and within 48 hours had reached a decision that complete evacuation of the peninsula was necessary. His report was shortly received with alarm in London, where it drew the classic Churchillian rebuke “He came, he saw, he capitulated”. Buchan’s view was that no better man could have taken on a near impossible position.

Kitchener, in his political position, (rather than the military role in which he excelled) was now being pushed and pulled from all sides and was feeling the strain. He was troubled by the implications of Monro’s recommendation, which may explain his rapid leap to support yet a different plan presented to him by the intrepid Commodore Roger Keyes, Chief of Staff to Admiral de Robeck in the Dardanelles (Keyes was a dasher, and would reappear heroically in1918). Keyes’ plan (supported by the Deputy Admiral of the Fleet, de Wemyss, but not by de Robeck) was for an audacious forcing of the Straits by the Royal Navy, utilising improved minesweeping abilities, to access the Sea of Marmora and isolate the Turkish army. Kitchener was keen, but telegraphed Birdwood, the senior officer remaining on Gallipoli, that he was coming out there to see for himself evacuation options.
The die had been cast for the ending of Gallipoli, but there were still three months of misery and hardship to be endured. In the words of Churchill “disease and despondency” surrounded those left on the ground. Nevertheless, until the definitive plans for evacuation began, the arguments continued regarding pressing on in Gallipoli versus transferring resources to Salonika to support Serbia. Kitchener left for his visit to Gallipoli on 4th November, still sympathetic to the ambitious Keyes plan but with the uncertainty of the War Committee (now excluding Churchill) behind him. When he arrived, he found the troops on the ground to be resilient, and capable of fighting on, but his discussions dissuaded him from the Keyes plan. Instead, he and Admiral de Robeck concocted a plan for a new naval landing at Ayas (today Iskenderun at the coastal border of Turkey and Syria). The aim would be to cover an evacuation of Gallipoli, but also forestall any consequent Turko-German response towards Egypt (He was aware that Mackensen’s marauding force, currently in Serbia, was  popularly known in Germany as the ‘Army of Egypt’). However, his new plan was not well received in London – by the Admiralty or the War Committee. These decisions proved the final straw for Churchill, who resigned from the Government. They also weakened further Kitchener’s own authority. He returned to London on 30th November and offered his resignation but it was not accepted.
On 7th December, the Government decided to evacuate Suvla Bay and the ANZAC beachheads, but to hold Cape Helles for strategic purposes. The winter storms of the Aegean had started and it would be a race against time to get the men away before being precluded from doing so. Late November rains turned trenches into rivers, and when the temperature plummeted men on duty – weeks earlier choking on dust and heat – began to die of exposure and frostbite. Publication of Gallipoli casualties on December 11th revealed over 100,000 men dead, wounded or missing in the past seven months, but an equivalent number had been evacuated because of disease – predominantly dysentery and paratyphoid.
On 8th December, Monro issued detailed orders to Birdwood for covert withdrawals from Suvla Bay and ANZAC, as the prelude to evacuation. Over the next two weeks men, supplies and artillery were withdrawn stealthily, at night, whilst keeping up the appearance of day time actions against the Turkish defences. So successful was this approach that by 18-19thDecember it was possible to evacuate the remaining battalions without loss, leaving behind only booby trapped trenches, spiked equipment and unneeded stores, the last of these providing a giant beach bonfire, set alight as the last boats pulled away. The weather had been kind for two nights, but within hours it broke, unleashing a great storm on deserted Suvla and ANZAC bays.
W Beach Cape Helles 7/1/16, shortly before evacuation.
How did the Turks not realise?
By now it had been decided after all that Cape Helles could not be held against the German heavy artillery now arriving in the Dardanelles area. A similar, but more risky, covert withdrawal would take place from the various Cape Helles beachheads. The Turks either were taken in again, or were themselves exhausted and unable to capitalize on their opportunities. On the nights of 7-8th January 1916, all forces were evacuated, under somewhat more challenging weather conditions, with only one man wounded.
And so ended the year long Gallipoli saga, or ‘Dardanelles Campaign’. Even in that terminology is the ambivalence regarding naval or land based operation. It should always have been combined. The final irony among many was that in this moment of strategic defeat and humiliation came the Allies most brilliant victory of the entire campaign. Asquith called the successful evacuations an achievement ”without parallel in military or naval history”. Superb planning and implementation under command of Monro, Birdwood, Byng, Davies and de Robeck undoubtedly made it happen. Birdwood in particular should be singled out. He had led the ANZACs from the outset with the same courage and determination shown by his men, and he was there with them at the death of the campaign.
This final chapter was, however, no compensation for Britain’s worst experience of the war to date.


Monday 12 October 2015

The Middle East and Africa

Mesopotamia, with its two great rivers, Tigris
and Euphrates, bridged Europe and Africa
to Persia and on to India
In the late 19th century, despite Britain’s domination of the seas – and hence world trade – Germany moved vigorously to build her own empire across the globe. The pace of acquisition increased following the accession of Kaiser Wilhelm II to the throne. Germany became a significant player in Africa. In the far east, Wilhelm was determined to be a player in the emerging geopolitical situation, and in the mid 1890s established its only major overseas naval headquarters at Tsing-tao. But the Kaiser’s favourite expansionist scheme was overland – the Berlin to Baghdad railroad. By wooing the weakening Ottoman empire, he planned to build his railway through Constantinople, and onwards to threaten Britain’s vital middle eastern interests, in Mesopotamia (today mostly Iraq), Palestine, Sinai and Egypt. Between the latter two, of course, lay Ferdinand de Lessep’s great creation, the Suez Canal. Although the Ottomans held most of the eastern Mediterranean, their influence was waning, and Britain was busy building strategic links with the various Arab tribes and factions. Britain was particularly concerned about Germany’s ambition for Baghdad, which in turn threatened Persia, and even India.

From the outset of the war a British military base was established on the Persian Gulf by the Shatt-el-arab, the final confluence of the two great regional rivers- the Tigris and Euphrates. Following Turkey’s entrance to the war in late 1914, skirmishes with advancing Turks built up over several weeks. In early 1915, reinforcements of Indian brigades were brought in, and by April this force had grown to two divisions strength – the 6th, under General Charles Townshend, and the 12th, under General George Gorringe.

Sir John Nixon
In overall command was Sir John Nixon, a veteran commander of British armies in India. His orders were to advance to Basra and its hinterland, in preparation for further advances towards Baghdad if necessary. In heavy fighting to the west of Basra the British Imperial forces were successful in routing the Turks. Emboldened to press on northwards up the Tigris to Amarah (a further 150 miles, and 300 miles from their starting point), Gorringe led his division, while Townshend moved further east to cut off any Turks retreating towrds Baghdad. Gorringe also had to cover his western flank, which necessitated striking out due west to take the city of Nasiriyeh, a further 100 miles away on the river Euphrates. The terrain, marshes and swamps, and the extreme heat were unforgiving, but the Indian battalions were accustomed to tough conditions and after a number of actions with gunboats Nasiriyeh was successfully occupied.
In August Nixon directed Townshend to return to the course of the Tigris and to move towards taking Kut. Through that month and September Townshend advanced gradually, with intermittent support from Arab tribes, and on 29th September, Townshend’s cavalry entered an undefended Kut. The Turks had retreated north westwards across the plains towards Baghdad.
This campaign was Britain’s most successful during the difficult year of 1915. However, their communication lines were now very stretched, and further progress towards Baghdad would prove difficult.

German Colonial Africa 1914
Africa. Africa lacked the strategic significance of Mesopotamia with its oil pipelines and gateways to the Suez Canal, Persia and India. Actions there were focal (although on large geographical scale) with forces only a fraction of those occupying eastern and western theatres of war.
Turkish/Ottoman attempts to advance through Sinai to the Suez Canal and Egypt and were easily repulsed by the British and colonial forces there. In West Africa the German Empire included Cameroon and parts of Nigeria. As in Mesopotamia, arduous climatic and topographical conditions were overcome by allied forces – on this occasion British and French troops – gradually to surround German held areas and drive them towards the sea. By 
mid 1915 the Germans were effectively prisoners in their own region.
The largest action took place in German South West Africa. General Botha’s forces (ironically British Empire and Dutch Boer troops fighting alongside each other) conducted a brilliant campaign from January 1915 through to July, progressively encircling the Germans in their capital Windhoek. On 9th July the Germans surrendered, and around 5000 prisoners and their equipment were taken. As Buchan notes: “Three hundred thousand square miles of territory had been conquered at a less cost than a minor action in the European theatre.”

In German East Africa (approximating to Tanzania today) a very different scenario unfolded. In late 1914 various incursions had been made from the neighbouring British colonies, but in early 1915 German responses threw the British out, and even took over some positions in British territory. The British response was to impose a naval blockade of the entire coast – some 300 miles. This trapped a German battle cruiser, the Konigsberg, which hid for several months among swamps and jungle before being snared and sunk. The Germans in East Africa were thus isolated, but not quite impotent. They managed to carry on a guerrilla style campaign for most of the war, tying down a relatively large number of British troops who, as a consequence, were unable to contribute at the Western Front. action.

Tuesday 6 October 2015

The Battle of Loos

The Loos Memorial at Dud Corner
During 1914 and 1915, with the exception of Ypres 1, the BEF played very much second fiddle to the large French forces employed against the invading German hordes - as at the Marne, the Aisne, Neuve Chapelle and Festubert. This would change from 1916 onwards, after Verdun and at the Somme. However, in the autumn of 1915 the French launched a second large-scale, two-pronged offensive against the German positions, which were by this time well nigh impregnable. Joffre's Second Champagne Offensive from late September to early November had the objective of forcing the German Third and Fifth Armies in the Argonne sector to withdraw along the Meuse river towards Belgium. The Champagne offensive gained a few miles of ground and captured some 25,000 German prisoners, but with German reinforcements brought into the sector from the Eastern Front, the French could not withstand repeated German counter-attacks. French losses were over 145,000 casualties by the time the Champagne offensive eventually drew to a close. 
Nevertheless for the British - led by Haig - Loos was a major battle that involved 150,000 British and 20,000 Indian and Gurkha soldiers for a fortnight and cost the lives of nearly 16,000 of them. This Artois offensive witnessed the first use of a gas cloud weapon by the British Army on the Western Front.

The battle of Loos was part of a three weeks simultaneous attack by French and British forces from Vimy Ridge to La Bassée, called the Third Battle of Artois. After much disagreement and debate between British and French high commands through the summer, it was agreed to attempt to break through the German Front in Artois, as a left sided pincer behind the main French offensive north eastwards from Champagne. With success it would compel the German Second and Seventh Armies caught between the two attacks to pull back to the Belgian border in order to protect their road and rail communication routes on the Douai plain. There were two things that the British were asked to do to help. Firstly they were asked to take over twenty-two miles of the French sector of front astride the Somme river, in order to free up General Pétain’s French Second Army to take part in the Champagne offensive, and secondly they were invited to attack on the flank of General d’Urbal’s French Tenth Army, advancing east from Artois.  The French planned to take the dominating Vimy Ridge to give cover and support to the British push. In the event they got on to the ridge but did not succeed in pushing the Germans off it. Although Sir John French had agreed in principle, the BEF were able to attack only on a  fifteen miles front north of the Somme, from Curlu to Hebuterne.

In the months since the last British foray, German defences had grown in depth and sophistication. there were second, third and in some places fourth lines of trenches and fortifications. Along the first German line, which the British would hit 200-400 yards after leaving their own trenches, were a series of redoubts, or fortified positions, given names like Railway Redoubt, Hohenzollern Redoubt, The Pope’s Nose, Loos Road Redoubt and Lens Road Redoubt.

Tower Bridge, lifting station for the Loos Coal mine
dominated the Loos village skyline
 The whole area of the  British attack was heavily industrialised, and they would have to overcome the mining village of Auchy, situated between the two German defence lines in 2 Division’s sector, the Hohenzollern Redoubt and Fosse 8 in front of 9 Division, 'Tower Bridge' on the boundary between 15 Division and 47 Division, and the double crassier - two slag heaps side by side running west to east back from the German firing line and over 100 feet high. These higher defences could bring direct or indirect fire down anywhere in the area of the offensive, and until those objectives were in British hands, no artillery could be safely moved forward to support a British advance beyond the first German defence line. 
 
Difficult industrial terrain, more so even than
around Mons in Belgium
The British attack achieved some success north of Loos and by the end of the first day (25th September) they had passed through Loos village and reached the outskirts of the industrial, built-up town of Lens. Crucial time lost by the delayed arrival of the reserve divisions added to problems of command and control of the troops on the ground east of Loos. These had inadvertently headed south instead of east in the confusion of battle and the confusion created by similar pit-head landscape features in this mining area. This slow mobilisation of the BEF's reserves brought open disagreement between Douglas Haig and Sir John French, and was an important factor in the subsequent replacement of French by Haig. The pause in the attack gave the German Fourth Army time to bring in reserves to the area overnight to reinforced a new German second position located on higher ground with good views across the British attack area. The British did not succeed in making any headway against this position and suffered heavy casualties on 26th September. A second British advance against the German Second Position in early October, as bad weather closed in, failed with heavy casualties and the Loos offensive was effectively over.


The lessons learned by the German defenders in these 1915 autumn battles was the value of “Defence in depth”, whereby the defenders man the front line lightly; the attacker is initially allowed to gain some ground beyond his own artillery cover in the opening phase of an attack, and then is counter-attacked by groups of well-placed defenders in second and third positions constructed behind the Front Line. 

One more costly failed offensive  by the Western Front allies.